Its the most wonderful time of the year!
Or at least that's what the song says. Personally, I love all seasons of the year for different reasons. One of the reasons I do love this time of year though is that my childhood basically taught me that the colder months of the year were filled with presents. First, there was Back-to-School Shopping, which as a stationery lover, was always amazing for me. Then in October, my mother and brother had their birthdays, as well as Halloween happening at the end of the month and then we'd move right in Christmas when my sister and I celebrated our birthdays. While it was tough on the gift side of things, I did learn that it wasn't the amount spent on the gift but the love behind it that mattered. That is why, even today, when inviting people to my birthday, I remind people that I want their presence, not their presents.
I should note here, that the pictures below were all taken by a mutual friend of ours that also attended the class.
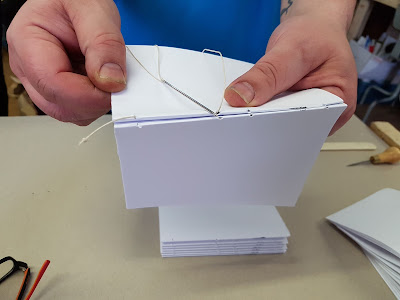
We started off with taking about fifty sheets of plain paper and folding them over in groups of five. Then we poked four holes along the edge and tied them together with a needle and beeswaxed thread.
 |
| Take a piece of tough string and run it through beeswax a few times. |
 |
| Poke four holes through each sheaf of paper. Then start running the thread through, tying each sheaf to the others as you go. |
 |
| Here is what the finished set of knotwork looks like. |
After that, you get to glue on a type of cheesecloth over the spine to help it stay together and you glue on the inner pages. Once you're done you can choose your cover colour and measure out cardboard to make the hardcover. Then you can take the leather or other cover material and glue your cardboard onto it. Then you can wrap the leather around it and glue your book into it. After that, you can press the books to get the inner glue to stick your books together super tightly.
 |
| Unfortunately, I missed getting pictures of most of the cover making and final assembly, but we did get a picture of all of our notebooks getting pressed in the machine though! |
In the end, you have a perfect, little, finished book; notebooks in our cases, since we just used plain paper.
 |
| Here are our finished books. |
The person running the class even let us use some gold leaf and design our books to be more personalized. Unfortunately, the gold leaf didn't stick on the bottom design of mine; its the one in the back that says Feytouched, which is my preferred online handle.
Overall, we had a great time making these, even if my cover ended up a bit misshaped on the spine end. I really like the way it turned out, though the rose design on the bottom didn't take the gold leaf well, so it looks more embossed than gold-leafed. One of my latest art supplies though happened to be silver and gold ink, which makes me wonder if I could ink it and make it as nice as the rest. If I do attempt it, I'll share the results in a future post.
Offhand, if you are ever looking for a really cool way to spend an afternoon, talk to your local book bindery and see if you can find a place that offers the class. If you're in Calgary, Alberta, I really suggest calling Octavia Book Bindery. It was where we went and they were awesome. I learned a lot and it absolutely rocked. Have you ever done bookbinding? Do you think it would be something you'd enjoy? Let me know in the comments below!

No comments:
Post a Comment